Plexe Examples - Getting Started with the Plexe API
This exercise is proposed to start getting acquainted with Plexe and its API.
In this exercise we want to command a vehicle in a platoon to perform an action, and also to communicate with the other vehicles in the platoon. In particular, we want to send the commands necessary to let the last vehicle abandon the platoon, leaving the formation, and then we want to inform all remaining vehicles that the platoon formation has changed.
Solving this guided exercise you will learn:
- The Plexe project folder structure;
- How to change the behavior (e.g., speed) of a vehicle;
- How to use inter-vehicle communication in Plexe.
Exercise outline
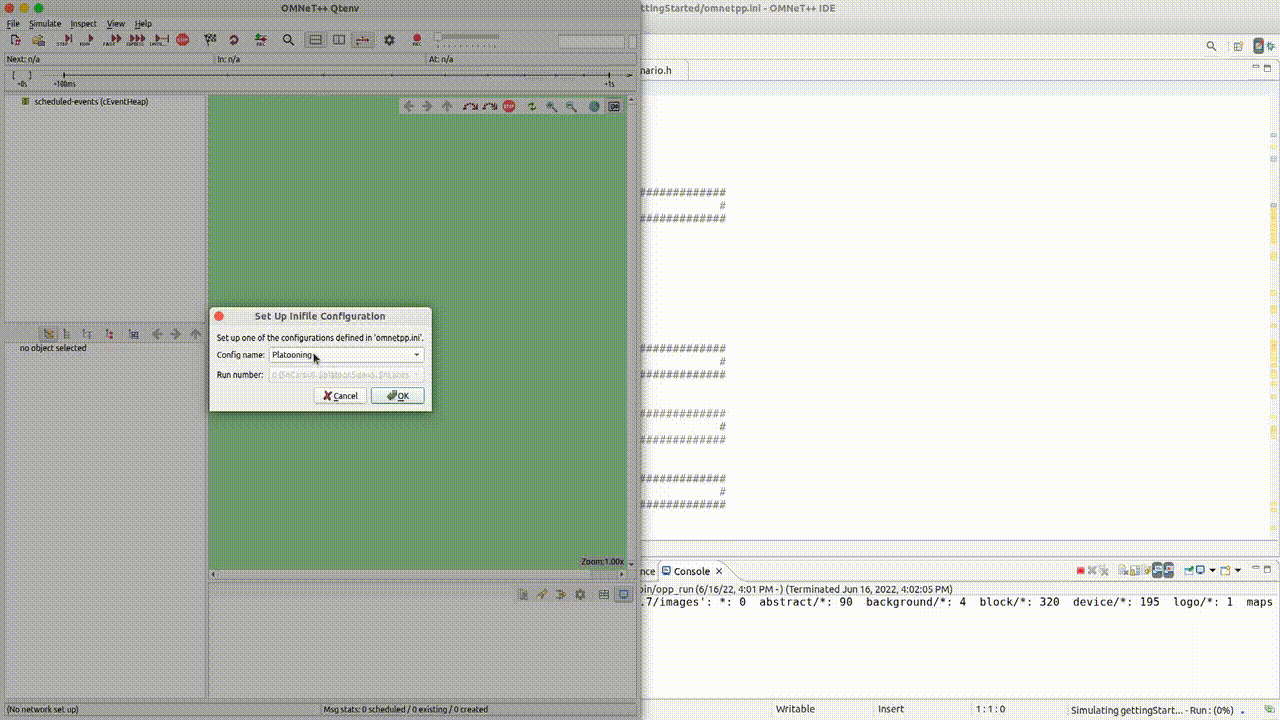
We will implement the solution of this exercise as a modification to the Platooning1 scenario, i.e., one of the example scenarios made available by Plexe that you can run issuing these commands from your terminal.
1
2
3
4 cd $HOME/src/plexe
source setenv
cd examples/platooning
plexe_run -u Cmdenv -c Platooning -r 2
The Platooning scenario shows a platoon made up of 8 cars controlled by a Cooperative Adaptive Cruise Controller (CACC) that travels on a straight piece of Highway for 60 seconds. While on travel, cars target an inter-vehicle distance of 5m.
We will customize this initial scenario proceeding according to this list of steps:
- At some given instant of time, we want the last vehicle to start braking, so to safely increase its distance from the rest of the platoon before abandoning the formation. We will be satisfied when the gap will have grown from 5m to 15m.
- While braking, we need a mechanism too keep monitoring the width of the gap, and stop braking when the last car has reached the target 15m safety-distance from the platoon.
- When this safety requirement is satisfied, the last vehicle should turn off the Cooperative ACC (CACC) and switch to a plain ACC, essentially detaching from the platoon.
- This last vehicle should also inform the platoon leader that he has just left the current formation, the leader should propagate this information back to all other vehicles.
Step 1: Scenario customization
The Plexe Documentation illustrates the content of the directories used to organize the source code of Plexe. We now focus on the scenarios folder. In general, in every simulation the behavior of vehicles depends on many factors, for example, on the cooperative-driving Application that the vehicle is running (check docs about apps folder) or on the mobility properties of the vehicle as governed by SUMO. An experimenter may wish to add an external stimulus to further drive the behavior of a simulation, for example, in the Sinusoidal2 configuration of the Platooning example the car leading a platoon is forced to keep speeding and braking so to exhibit a sinusoidal speed pattern. The Plexe folder organization suggests to code this external stimuli as Scenarios.
In our exercise we want to start from the Platooning scenario as configured in examples/platooning/omnetpp.ini.
1
2
3
4
5
6
7
8
9
10
11 # TraCIScenarioManager parameters #
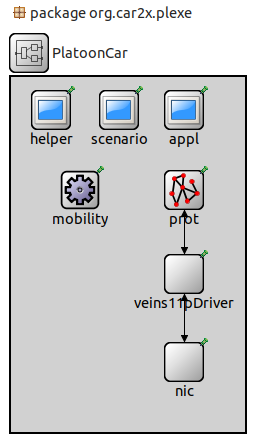
*.manager.moduleType = "org.car2x.plexe.PlatoonCar"
*.manager.moduleName = "node"
...
[Config Platooning]
*.manager.command = "sumo-gui"
#use the base scenario
*.node[*].scenario_type = "SimpleScenario"
The above piece of code says that all nodes, that in Plexe are mapped to PlatoonCar objects, should contain a SimpleScenario object as internal submodule.
1
2
3
4
5
6
7
8
9
10
11
12
13 module PlatoonCar {
parameters:
string scenario_type;
string helper_type;
string appl_type;
string protocol_type;
submodules:
helper: <helper_type> like BasePositionHelper
...
scenario: <scenario_type> like BaseScenario
...
appl: <appl_type> like BaseApp
...
1
2
3
4
5
6
7
8
9
10
11
12
13
14
15
16
17 void SimpleScenario::initialize(int stage) {
BaseScenario::initialize(stage);
if (stage == 0)
// get pointer to application
appl = FindModule<BaseApp*>::findSubModule(getParentModule());
if (stage == 2) {
// average speed
leaderSpeed = par("leaderSpeed").doubleValue() / 3.6;
if (positionHelper->isLeader()) {
// set base cruising speed
plexeTraciVehicle->setCruiseControlDesiredSpeed(leaderSpeed);
}
else {
// let the follower set a higher desired speed to stay connected
// to the leader when it is accelerating
plexeTraciVehicle->setCruiseControlDesiredSpeed(leaderSpeed + 10);
...
We need to customize the C++ source code contained in SimpleScenario.cc to add an event, scheduled only for the last vehicle of the platoon, that should be fired at simulation-time 10s; that will trigger the start of the detaching procedure.
Step 1 - Solution
1
2
3
4
5
6
7
8
9
10
11
12
13
14
15
16
17
18 [...]
else {
// let the follower set a higher desired speed to stay connected
// to the leader when it is accelerating
plexeTraciVehicle->setCruiseControlDesiredSpeed(leaderSpeed + 10);
// if we are the last vehicle, then schedule braking at time 10sec
std::vector<int> pFormation = positionHelper->getPlatoonFormation();
// if we are the last vehicle...
if (positionHelper->getId() == pFormation[pFormation.size() - 1]) {
// prepare self messages for scheduled operations
startBraking = new cMessage("Start Braking now!");
checkDistance = new cMessage("Check Distance now!");
// ...then schedule Brake operation
scheduleAt(10, startBraking);
}
[...]
1
2
3
4
5
6
7
8 void GettingStartedScenario::handleMessage(cMessage* msg)
{
if (msg == startBraking) {
// Increase CACC Constant Spacing (set it to 15m)
plexeTraciVehicle->setCACCConstantSpacing(15.0);
traciVehicle->setColor(TraCIColor(100, 100, 100, 255));
// then start checking when we reach that 15m distance
scheduleAt(simTime() + 0.1, checkDistance);
-
Beyond the startBraking event, we are initializing already also the checkDistance event to be used later for solving Step 2. The declaration of these
cMessage*variables is not shown in the code snippets and should be added to SimpleScenario.h -
How do we identify the last car of the platoon? By asking information about the current formation of the platoon and checking if our vehicle ID matches with the one of the last vehicle in the formation. For retrieving this kind of information about the position of vehicles in a platoon it is always recommended to rely on the Position Helper, as we did with
positionHelper->getPlatoonFormation();The position helper is a submodule of each Platoon Car, so it is available in each car object, and its goal is to offer platooning-related information such as the ID of the platoon leader or of the vehicle in front of us. Check out the Utilities documentation, describing in more details the functionalities offered by the Position Helper/Manager classes. -
When the startBraking event is intercepted by the
handleMessagge()implemented by SimpleScenario.cc, we do 3 operations:- We Increase the CACC Constant Spacing (from 5m we set it to 15m) with
setCACCConstantSpacing(), which is one of the many functions documented in the Plexe API. - We change the Car color through TraCI, i.e., the SUMO Traffic Control Interface with
traciVehicle->setColor(...);. ThetraciVehicleis a further submodule of each Platoon Car object, exposing most of the functionalities defined by the SUMO TraCI interface. - We schedule, in just 0.1s from the current simulation time, a check of the distance from the front vehicle.
- We Increase the CACC Constant Spacing (from 5m we set it to 15m) with
Step 2: Monitoring distance
We concluded the last step asking to the car that is abandoning the platoon to increase its distance from the platoon to a value of 15m.
The operation we have commanded via setCACCConstantSpacing() will result in our car to start braking, and only after some actuation time the last car will really be 15m away from the platoon.
How do we understand that this necessary actuation time has passed and that we have reached the desired safety-distance?
The solution is to keep checking our distance from the vehicle in front of us using getRadarMeasurements(), one further function offered by the Plexe API. Notice that, as last operation of the solution to Step 1, we started planning an operation of “distance-checking” by scheduling a self-message called “checkDistance”.
Step 2 - Solution
1
2
3
4
5
6
7
8
9
10
11
12
13
14
15
16
17
18
19
20
21
22
23
24 void GettingStartedScenario::handleMessage(cMessage* msg) {
if (msg == startBraking) {
...
}
else if (msg == checkDistance) {
// Checking current distance with radar
double distance = nan("nan"), relSpeed = nan("nan");
plexeTraciVehicle->getRadarMeasurements(distance, relSpeed);
LOG << "LEAVING VEHICLE now at: " << distance << " meters" << endl;
if (distance > 14.9) {
// We are almost at correct distance! Turn to ACC (i.e., abandon platoon...)
plexeTraciVehicle->setActiveController(ACC);
plexeTraciVehicle->setACCHeadwayTime(1.2);
traciVehicle->setColor(TraCIColor(200, 200, 200, 255));
// send abandon Platoon message to leader
appl->sendAbandonMessage();
}
else {
scheduleAt(simTime() + 0.1, checkDistance);
}
}
}
- In the
handleMessage()function, whenever we handle a “checkDistance” message, we use the radar to save into thedistancevariable the current value of our distance from the vehicle in front us, then:- if our distance is close to 15m (
> 14.9in the code), we do some operations to really abandon the platoon; - otherwise, we understand that we are still not distant enough, so we reschedule a “distance-check” in a tenth of second from the current simulation-time
with
scheduleAt(simTime() + 0.1, checkDistance);
- if our distance is close to 15m (
- When we are actually ready to abandon the platoon, to stop using the Coperative ACC we:
- Switch to a plain ACC with
plexeTraciVehicle->setActiveController(ACC);, we do not forget to also initialize a reasonable Headway-Time for an ACC equal to 1.2s; - We send an Abandon Message using
appl, which represents one application installed in our PlatoonCar. NB: each PlatoonCar contains an Application submodule instantiated into an object referenced by the already seenapplpointer.
- Switch to a plain ACC with
Starting this exercise we commented about the fact that, in a simulation, environmental factors or external stimuli shall be coded as Scenarios.
Here instead we see for the first time the use of Applications, that we should consider as software able to exploit all the resources of a modern vehicle,
including radio equipment, to let the vehicle perform some automatic operations. In Plexe new applications should be coded into the apps folder as extensions to BaseApp. It is always a good idea to carefully read the Plexe Documentation that, for instance,
describes the BaseApp this way:
apps/BaseApp: The aim of the application is mainly to pass wirelessly received data to the automated controllers
(the application, in our case).
In addition, the application takes care of logging mobility information such as speed, acceleration, distance, etc.
The idea is to have a base application that provides basic functionalities.
More sophisticated applications can inherit from this base application.
The provided apps folder makes available to experimenters some sample applications, including the GeneralPlatooningApp, which will be our source of inspiration to write a new application dedicated to correctly send and handle messages used to notify that a car is abandoning the platoon. Our new application will be called GettingStartedApp and will take care of handling AbandonPlatoon messages. It is time to draw a new action list of what we need to do to develop our new application:
- Define a new Message Type (i.e.,
AbandonPlatoonmessage). - Implement, in our application, the transmission-side of AbandonPlatoon messages, namely, implement the
appl->sendAbandonMessage()method we used in the solution of Step 2.- This includes learning how to encapsulate packets inside 802.11p frames. Check out the Plexe Documentation about drivers.
- Implement also the receiver-side.
- Bonus Track: Plexe comes with many predefined messages, let’s use them! At the end of the reception of an AbandonPlatoon message let the leader broadcast a
NewFormationmessage to inform all remaining vehicle that the platoon formation has been updated.
Step 3: New Maneuver Message
Step 3 - Solution
Create a file called AbandonMessage.msg under /src/plexe/messages with this content:
1
2
3
4
5
6
7 import ManeuverMessage;
// Message sent by a vehicle to notify the leader that this vehicle left the platoon.
// NB: this message contains also all fields inherited from ManeuverMessage!
// e.g., vehicleId and platoonId
packet AbandonPlatoon extends ManeuverMessage {
string msgContent = "Goodbye I'm leaving";
}
The solution is straightforward, providing the definition of a new packet of type AbandonPlatoon which extends a ManeuverMessage, this last
is already available in Plexe and its definition is included in src/plexe/messages/ManeuverMessage.msg
1
2
3
4
5
6
7
8
9
10
11
12
13
14
15
16
17 cplusplus {{
/* message type for maneuver messages */
static const int MANEUVER_TYPE = 12347;
}}
// General message for an arbitrary maneuver to holds common information.
// Only children of this message should be initialized.
packet ManeuverMessage {
// id of the originator of this message
int vehicleId;
// id of the platoon this message is about
int platoonId;
// id of the destination of this message
int destinationId;
// sumo external id of the sender
string externalId;
}
- It is most of the time recommended to define new packets as extension to Maneuver Messages, since information such as
vehicleId,platoonIdanddestinationIdare necessary for the correct processing of packets… in 99% of the conceivable scenarios. - NB: plexe/messages/ManeuverMessage.msg contains also the definition of
static const int MANEUVER_TYPE = 12347;. Assigning to packets that share a similar purpose (in the present case, messages supporting some coordinated maneuver) a unique ‘TYPE’ is a good practice to enable easy filtering of packets at reception time. Do not forget that, in Vehicular networks, transmissions are most of the time broadcast, so filtering packets can become extremely important.
Now that we have our definition of an AbandonPlatoon message, it is time to learn how to send it.
We want to put together all the business logic related to sending/receiving this kind of messages into a single application, therefore, we actually now need to start setting up our GettingStartedApp which will be made up of 3 files:
- GettingStartedApp.ned
- GettingStartedApp.h
- GettingStartedApp.cc
These files should be saved under /src/plexe/apps.
Step 4 - Writing an Application
When an experimenter starts creating a new application, a little bit of boilerplate code must be written. Luckily, a very little number of OMNeT++ code is enough, and these lines of code have actually a precise, immediate meaning. Essentially, in Vehicular Networks, applications usually run on top of a minimal MAC+PHY networking stack, leading to a typical APP-MAC-PHY 3-layers architecture which is simpler compared to a full, classic TCP/IP one. The first piece of code we shall write is the description of our Application as an OMNeT++ module using the Network Description Language (Ned) syntax and is needed to connect our APP to the MAC sublayer. Our GettingStartedApplication.ned should look like this:
1
2
3
4
5
6
7
8
9
10
11
12
13 package org.car2x.plexe.apps;
import org.car2x.plexe.apps.BaseApp;
simple GettingStartedApp like BaseApp {
parameters:
int headerLength @unit("bit") = default(0 bit);
@class(plexe::GettingStartedApp);
gates:
input lowerLayerIn;
output lowerLayerOut;
input lowerControlIn;
output lowerControlOut;
}
This provided NED description of our application is enough for the rest of Plexe to correctly bind our application to
the selected Network Interface Card (NIC), most of the time an 802.11p NIC. Furthermore, with @class(plexe::GettingStartedApp); we let OMNeT++ know
that the implementation of our Application module will be provided by some class called GettingStartedApp.
We define this class in the GettingStartedApp.h file.
1
2
3
4
5
6
7
8
9
10
11
12
13
14
15
16
17
18 class GettingStartedApp : public BaseApp {
public:
void sendAbandonMessage();
virtual void sendUnicast(cPacket* msg, int destination);
protected:
virtual void initialize(int stage) override;
virtual void handleLowerMsg(cMessage* msg) override;
BaseScenario* scenario;
private:
AbandonPlatoon* createAbandonMessage();
NewFormation* createNewFormationMessage(const std::vector<int>& newPlatoonFormation);
void handleAbandonPlatoon(const AbandonPlatoon* msg);
void handleNewFormation(const NewFormation* msg);
void sendNewFormationToFollowers(const std::vector<int>& newPlatoonFormation);
};
- GettingStartedApp is a child of the very important BaseApp class, so inherits from it the ability of exchanging data with the radio sublayer and to log mobility information as reported in the apps Documentation.
- Notice the name of the functions implemented by this class; these are either:
- send operations (
sendAbandonMessage,sendNewFormationToFollowers…); - receive operations, aka message handling routines (
handleAbandonPlatoon,handleNewFormation,handleLowerMsg) - auxiliary functions, in the present case helper to generate packets.
- send operations (
Before moving to Step 5 - Sending a Message, we provide the template of the implementation of the GettingStartedApp that should be written in a file called GettingStartedApp.cc.
1
2
3
4
5
6
7
8
9
10
11
12
13
14
15
16
17
18
19
20
21
22
23
24
25 #include "plexe/apps/GettingStartedApp.h"
Define_Module(GettingStartedApp);
void GettingStartedApp::initialize(int stage){ /*TO BE IMPLEMENTED*/ }
AbandonPlatoon* GettingStartedApp::createAbandonMessage(){ /*TO BE IMPLEMENTED*/ }
NewFormation* GettingStartedApp::createNewFormationMessage(const std::vector<int>& newPlatoonFormation)
{ /*TO BE IMPLEMENTED*/ }
void GettingStartedApp::sendAbandonMessage(){ /*TO BE IMPLEMENTED*/ }
void GettingStartedApp::sendNewFormationToFollowers(const std::vector<int>& newPlatoonFormation)
{ /*TO BE IMPLEMENTED*/ }
void GettingStartedApp::sendUnicast(cPacket* msg, int destination)
{ /*TO BE IMPLEMENTED*/ }
void GettingStartedApp::handleAbandonPlatoon(const AbandonPlatoon* msg)
{ /*TO BE IMPLEMENTED*/ }
void GettingStartedApp::handleNewFormation(const NewFormation* msg)
{ /*TO BE IMPLEMENTED*/ }
void GettingStartedApp::handleLowerMsg(cMessage* msg){ /*TO BE IMPLEMENTED*/ }
Step 5 - Sending a Message
In order to send an AbandonPlatoon message we have to:
- Create it;
- Encapsulate it in a 802.11p frame and transmit it.
The sendAbandonMessage() is limited to / makes explicit these 2 operations:
1
2
3
4
5
6
7 #include "plexe/messages/AbandonPlatoon_m.h"
void GettingStartedApp::sendAbandonMessage() {
getSimulation()->getActiveEnvir()->alert("Sending an abandon message");
AbandonPlatoon* abmsg = createAbandonMessage();
sendUnicast(abmsg, abmsg->getDestinationId());
}
- To work with the AbandonMessages as we defined them in the AbandonMessage.msg file, don’t forget to include the header file
generated automatically by the OMNeT++ compiler
#include "plexe/messages/AbandonPlatoon_m.h"; this directive can go in the GettingStartedApp.h file. getSimulation()...->alert("SOME TEXT")is a piece code useful all the times that the user wants some text to be displayed in the OMNeT++ GUI.sendUnicast(abmsg, abmsg->getDestinationId());abstracts the operation of encapsulating an Application Messages into a frame before transmission over the air. The implementation we provide here is taken from the source code of Plexe as also implemented in GeneralPlatooningApp.cc.
Now let’s see the implementation of createAbandonMessage() and of sendUnicast():
1
2
3
4
5
6
7
8
9 AbandonPlatoon* GettingStartedApp::createAbandonMessage() {
AbandonPlatoon* abmsg = new AbandonPlatoon();
abmsg->setVehicleId(positionHelper->getId());
abmsg->setPlatoonId(positionHelper->getPlatoonId());
abmsg->setDestinationId(positionHelper->getLeaderId());
abmsg->setExternalId(positionHelper->getExternalId().c_str());
abmsg->setKind(MANEUVER_TYPE);
return abmsg;
}
1
2
3
4
5
6
7
8
9
10
11
12
13
14 void GettingStartedApp::sendUnicast(cPacket* msg, int destination) {
Enter_Method_Silent();
take(msg);
BaseFrame1609_4* frame = new BaseFrame1609_4("BaseFrame1609_4",
msg->getKind());
frame->setRecipientAddress(destination);
frame->setChannelNumber(static_cast<int>(Channel::cch));
frame->encapsulate(msg);
// send unicast frames using 11p only
PlexeInterfaceControlInfo* ctrl = new PlexeInterfaceControlInfo();
ctrl->setInterfaces(PlexeRadioInterfaces::VEINS_11P);
frame->setControlInfo(ctrl);
sendDown(frame);
}
- The creation of a message like in
createAbandonMessage()most of the time requires:- The allocation of a new message object.
- The initiliazation of its fields using setter methods, in the present case we retrieve the proper values using, once more, the Position Helper.
- NB We also tag the created message with its
KINDvalue, set to the constantMANEUVER_TYPE.
- The code in
sendUnicast(cPacket* msg, int destination)takes care of:- Encapsulating messages in BaseFrames.
- Preparing the use of the radio equipment, e.g., by selecting the proper frequency.
- Pushing the frame down to the MAC layer.
For this last operation, i.e., pushing/pulling messagges downto/upto the application layer, the application must be correctly
initialized and bound to the MAC. This is done as shown in the initialize() function:
1
2
3
4
5
6
7
8
9
10
11
12 void GettingStartedApp::initialize(int stage) {
BaseApp::initialize(stage);
if (stage == 1) {
// connect application to lower layer
protocol->registerApplication(MANEUVER_TYPE, gate("lowerLayerIn"),
gate("lowerLayerOut"), gate("lowerControlIn"),
gate("lowerControlOut"));
// register to the signal indicating failed unicast transmissions
findHost()->subscribe(Mac1609_4::sigRetriesExceeded, this);
scenario = FindModule<BaseScenario*>::findSubModule(getParentModule());
}
}
1 *.node[*].protocol_type = "SimplePlatooningBeaconing"
The Plexe architecture demands the duty of implementing the exchange of messages between the APP and the MAC layer
to what is simply called the protocol. The Plexe Documentation about Protocols is again a precious resource to understand the role of the protocol submodule available in each PlatoonCar object:
- `protocols/BaseProtocol.*`: We implement a base protocol that takes care of loading parameters from configuration file,
recording network statistics, and providing primitives for sending frames.
This class defines a virtual messageReceived() method that inheriting classes can override
to get notified about incoming data frames.
In addition, BaseProtocol performs application multiplexing.
Applications can register to BaseProtocol to obtain copies of received frames of a particular type.
- `protocols/SimplePlatooningBeaconing.*`: This class extends the base protocol and implements a
classic periodic beaconing protocol sending a beacon every x milliseconds.
- In our omnetpp.ini
we configure all vehicles to use a the
SimplePlatooningBeaconingas protocol submodule. - As shown before, during initializing our APP with
GettingStartedApp::initialize()we take care of performing application multiplexing as explained in the Documentation about Protocols by registering to the reception ofMANEUVER_TYPEmessages, since theAbandonMessagewe defined is indeed of typeMANEUVER_TYPE.
At this stage, the last vehicle of our platoon should be really able to send an Abandon Platoon message
when in the SimpleScenario code we do appl->sendAbandonMessage();, but no vehicle is ready to decode/handle
such packets yet.
Step 6 - Handling a Message
In this step we implement the handler functions to let the platoon leader parse Abandon Messages and thus understand that some vehicle is leaving the platoon. Notice that, however, an application like our GettingStartedApp may be able to parse messages of different types, not just Abandon Messages. For instance, later we will add the support also to the use of NewFormation messages. Anyhow all messages arrive to our application from the MAC/Radio sublayers. For this reason, a common practice when implementing the receiver-side of a new application is to:
- Start from the
handleLowerMsg(), i.e., a function responsible of:- Intercepting all kind of packets received by the vehicle radio;
- Decapsulate packets removing PHY-MAC headers;
- Identifying the type of packets (e.g., Abandon or NewFormation messages) and activate the dedicated packet handler routine.
- Implement a specialized handler function for each supported kind of packets. In the present case we have to implement
handleAbandonPlatoon()andhandleNewFormation()
Step 6 - Solution
1
2
3
4
5
6
7
8
9
10
11
12
13
14
15
16
17
18
19
20
21 void GettingStartedApp::handleLowerMsg(cMessage* msg) {
BaseFrame1609_4* frame = check_and_cast<BaseFrame1609_4*>(msg);
cPacket* enc = frame->getEncapsulatedPacket();
ASSERT2(enc, "received a BaseFrame1609_4s with nothing inside");
if (enc->getKind() == MANEUVER_TYPE) {
ManeuverMessage* mm = check_and_cast<ManeuverMessage*>(
frame->decapsulate());
if (AbandonPlatoon* msg = dynamic_cast<AbandonPlatoon*>(mm)) {
handleAbandonPlatoon(msg);
delete msg;
}
else if (NewFormation* msg = dynamic_cast<NewFormation*>(mm)) {
handleNewFormation(msg);
delete msg;
}
delete frame;
}
else BaseApp::handleLowerMsg(msg);
}
- The code shows how cMessages arriving from the lower layer are filtered by Kind
if (enc->getKind() == MANEUVER_TYPE). - Furthermore, packets accepted by the filtering condition are delivered to the proper handler function and then deleted to avoid memory leaks.
- NB The BaseApp class makes… a lot of dirty job under the hood for us, handling packets that our
GettingStartedAppdoes not have to handle directly. This is a why a good<SOME-APP>::handleLowerMsg()should dispatch unknown packets to its parent class, i.e., toBaseApp::handleLowerMsg().
1
2
3
4
5
6
7
8
9
10
11
12
13
14
15
16
17
18
19
20
21
22
23
24
25
26
27
28
29
30
31
32 void GettingStartedApp::handleAbandonPlatoon(const AbandonPlatoon* msg) {
if (msg->getPlatoonId() != positionHelper->getPlatoonId())
return;
// only leader listens to AbandonMessages
if (msg->getDestinationId() != positionHelper->getLeaderId())
return;
if (msg->getDestinationId() != positionHelper->getId())
return;
// Retrieving relevant info from Abandon Message
int leaderID, leaverID, platoonID;
leaderID = positionHelper->getId();
leaverID = msg->getVehicleId();
platoonID = msg->getPlatoonId();
// Informing SUMO via Plexe Interface to remove vehicle from platoon
plexeTraciVehicle->removePlatoonMember(msg->getExternalId());
// Changing platoon Formation...
std::vector<int> formation = positionHelper->getPlatoonFormation();
// Removing the vehicle that abandoned the platoon
formation.pop_back();
positionHelper->setPlatoonFormation(formation);
char text[250];
sprintf(text, "LEADER[%d]: I'm removing v<%d> from platoon<%d>\n", leaderID, leaverID, platoonID);
LOG << text << endl;
getSimulation()->getActiveEnvir()->alert(text);
sendNewFormationToFollowers(formation);
}
- A common practice when coding handler functions is to add an initial block of
ifconditions to ensure that the packet is handled only by the correct, intended recipient of the packet. In the present case, we want AbandonMessages to be caught only by the leader of the platoon we are traveling with, so the message should, first of all, report asPlatoonIdthe samePlatoonIdof the car that is processing the packets, furthermore, the ID of the message recipient should be theVehicleIdof the vehicle leading the platoon. - The rest of the code extracts from the message the most relevant information and then uses them to really update the platoon formation.
NB, updating the platoon formation is a responsibility of the positionHelper, and also SUMO should be informed about the
formation of platoons to correctly implement the dynamics of vehicles under different Cruise Controllers. For this reason, we highlight
in the above snippet of code the use of
plexeTraciVehicle->removePlatoonMember(msg->getExternalId());and ofpositionHelper->setPlatoonFormation(formation); - Once the
formationvector has been updated, with the last line of code the platoon leader informs all other vehicle about the existence of the new formation by callingsendNewFormationToFollowers(formation);.
First, we can create NewFormation.msg within the /src/plexe/messages folder:
1
2
3
4
5
6
7
8
9
10 import ManeuverMessage;
// Message sent by a vehicle (as in GettingStarted example)
// to notify the leader that this vehicle left the platoon.
// NB: this message contains also all fields inhereited from ManeuverMessage!
// e.g., vehicleId and platoonId
// NB2: GettingStartedApp shows how to send/receive Maneuver Messages
packet NewFormation extends ManeuverMessage {
int platoonFormation[];
}
The transmission and reception of NewFormation messages is implemented as shown here below:
1
2
3
4
5
6
7
8
9
10
11
12
13
14
15
16
17
18
19
20
21
22
23
24
25 NewFormation* GettingStartedApp::createNewFormationMessage(const std::vector<int>& newPlatoonFormation)
{
NewFormation* nfmsg = new NewFormation();
nfmsg->setKind(MANEUVER_TYPE);
nfmsg->setPlatoonFormationArraySize(newPlatoonFormation.size());
for (unsigned int i = 0; i < newPlatoonFormation.size(); i++) {
nfmsg->setPlatoonFormation(i, newPlatoonFormation[i]);
}
return nfmsg;
}
void GettingStartedApp::sendNewFormationToFollowers(const std::vector<int>& newPlatoonFormation)
{
NewFormation* nfmsg = createNewFormationMessage(newPlatoonFormation);
int dest;
// send a copy to each platoon follower
for (int i = 1; i < newPlatoonFormation.size(); i++) {
dest = newPlatoonFormation[i];
NewFormation* dup = nfmsg->dup();
dup->setDestinationId(dest);
sendUnicast(dup, dest);
}
delete nfmsg;
}
1
2
3
4
5
6
7
8
9
10
11
12
13
14
15
16
17
18 void GettingStartedApp::handleNewFormation(const NewFormation* msg)
{
std::vector<int> newFormation;
for (int i = 0; i < msg->getPlatoonFormationArraySize(); i++)
newFormation.push_back(msg->getPlatoonFormation(i));
std::string formationString = "[ ";
for (int i = 0; i < newFormation.size(); i++) {
formationString += std::to_string(newFormation[i]) + " ";
}
formationString += "]";
char text[250];
sprintf(text, "v<%d> got newFormation = %s\n", positionHelper->getId(), formationString.c_str());
getSimulation()->getActiveEnvir()->alert(text);
positionHelper->setPlatoonFormation(newFormation);
}
Conclusion
Congratulation, you have completed the Getting Started with Plexe tutorial! Now you should be ready to define new simulation scenarios and write novel cooperative driving applications based on vehicular communications. Have fun with Plexe!
If you need more help don’t hesitate to contact:
How to Cite
If you use Plexe, please cite our work as
![]() Michele Segata, Renato Lo Cigno, Tobias Hardes, Julian Heinovski, Max Schettler, Bastian Bloessl, Christoph Sommer and Falko Dressler, "Multi-Technology Cooperative Driving: An Analysis Based on PLEXE," IEEE Transactions on Mobile Computing (TMC), 2022.
[DOI, BibTeX, Details...]
Michele Segata, Renato Lo Cigno, Tobias Hardes, Julian Heinovski, Max Schettler, Bastian Bloessl, Christoph Sommer and Falko Dressler, "Multi-Technology Cooperative Driving: An Analysis Based on PLEXE," IEEE Transactions on Mobile Computing (TMC), 2022.
[DOI, BibTeX, Details...]
Footnotes
-
The Platooning scenario is one of the Scenarios included in the Platooning example project of Plexe. ↩
-
The first Plexe Tutorial teaches you how to run the Sinusoidal scenario. ↩